
SHIP LIVING WORKFLOW DIAGRAMS.
Render any n8n workflow as a pixel-perfect image with one POST — or host it at a permanent URL that re-renders when your workflow changes. Raw HTTP, the npx pixtex CLI, a GitHub Action, or a node on your own n8n canvas — built for CI, docs, and READMEs. Free keys, no signup.
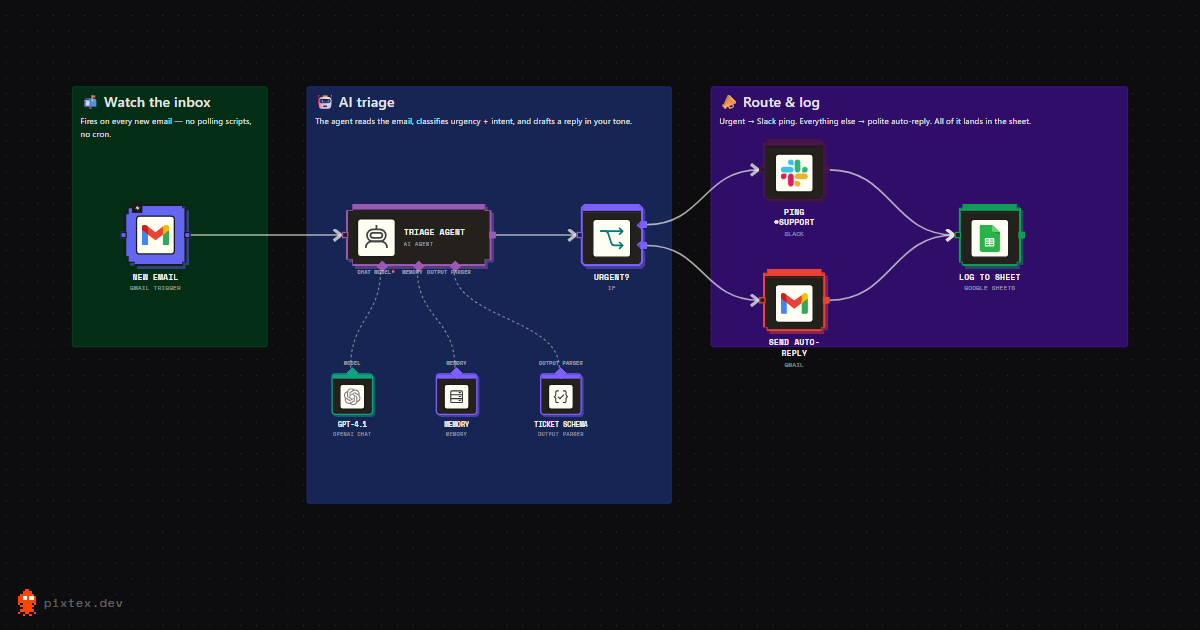
POST /v1/render → a 1200×630 PNG, no n8n running
Get a key
Enter your email below, open the confirmation link and press Create my key — the key is minted the moment you do, shown once, and stored as a SHA-256 hash. Nothing else is needed to start: no card, no account, no install.
We email you a confirmation link — your key is minted when you confirm on the page it opens, shown once, and we store only its hash. Up to 3 active keys per email. No newsletter, ever.
Prefer the terminal? npx pixtex signup you@example.com does the same thing. Whichever way you get it, the key stays in this tab only — the sample render above and every snippet below can borrow it without it ever being written down.
Pick your path
Four ways in, and you want exactly one of them. Everything below is the same API underneath, so the only question is where you would rather type.
Render an image
POST /v1/render takes your workflow JSON in the body (never in a URL) and returns the finished image — png, jpeg, webp, svg or pdf. Omit any option and it falls back to the editor’s defaults.
# workflow.json — any workflow exported from n8n
jq '{workflow: .}' workflow.json > request.json

curl -X POST https://api.pixtex.dev/v1/render \
  -H "Authorization: Bearer $PIXTEX_KEY" \
  -H "Content-Type: application/json" \
  --data @request.json -o workflow.png

# same options the editor has — mix and match:
jq '{workflow: ., options: {background: "midnight", frame: "og", format: "webp"}}' \
  workflow.json > request.json
The workflow travels in the request body, never in a URL and never into a log. Every option below is optional; send { "workflow": … } on its own and you get the editor's defaults.
Host a living diagram
POST /v1/images renders once and gives you a permanent image URL, a permanent page URL and a ready-made markdown line. Embed the image in a README, Notion page or forum post; send the page to anyone who should see the diagram without opening n8n — then PUT the same id whenever the workflow changes and both update in place.
Your workflow JSON is used for the render and discarded — only the PNG is stored. Every hosted image gets two permanent addresses: the PNG at imageUrl, for embedding in a README or Notion, and a page at pageUrl — the poster with its title, node count and a download button, unfurling as a card wherever the link is pasted. Embed the image; send the page.
jq '{workflow: ., name: "Order sync"}' workflow.json |
curl -X POST https://api.pixtex.dev/v1/images \
  -H "Authorization: Bearer $PIXTEX_KEY" \
  -H "Content-Type: application/json" \
--data @-{
"image": { "id": "aB3xK9_qLw4", "name": "Order sync", … },
"imageUrl": "https://api.pixtex.dev/i/aB3xK9_qLw4.png",
"pageUrl": "https://pixtex.dev/w/aB3xK9_qLw4",
"markdown": ""
}# workflow changed? re-render in place — the URL never changes
jq '{workflow: .}' workflow.json |
curl -X PUT https://api.pixtex.dev/v1/images/aB3xK9_qLw4 \
-H "Authorization: Bearer $PIXTEX_KEY" \
-H "Content-Type: application/json" \
--data @-Embeds refresh as caches revalidate (≤ 1 hour). Free-tier hosted images carry a small Pixtex watermark; Pro hosts up to 1,000 of them clean — so the page a client opens shows their workflow and nothing else.
The npx pixtex CLI
The pixtex CLI wraps everything above — render, push, update in place, recover lost URLs — with zero dependencies to install. Set PIXTEX_API_KEY in your environment and go.
# zero-install — runs straight from npm (Node 20+)
npx pixtex render my-flow.json                 # local PNG
npx pixtex push my-flow.json                   # host at a permanent URL
npx pixtex push my-flow.json --id aB3xK9_qLw4  # update the same URL in place
npx pixtex images                              # every hosted image + its URL
npx pixtex me                                  # quota + usage

# the editor's full option set, as flags:
npx pixtex render my-flow.json --background midnight --frame og --format webp
npx pixtex --help lists every command and flag. Source on GitHub.
GitHub Action
The Pixtex Action re-renders your hosted diagram on every push, so the image in your README never drifts from the actual flow. Add your key as a repo secret named PIXTEX_API_KEY, then:
# .github/workflows/pixtex.yml
name: Update workflow diagram
on:
  push:
    branches: [main]
    paths: ['workflows/**.json']   # wherever your workflow JSON lives

jobs:
  render:
    runs-on: ubuntu-latest
    steps:
      - uses: actions/checkout@v4
      - uses: VicegerentPrince/pixtex@v1
        with:
          workflow: workflows/order-sync.json
          api-key: ${{ secrets.PIXTEX_API_KEY }}
          image-id: ${{ vars.PIXTEX_IMAGE_ID }}   # omit on the first run
First run: leave image-id out so a new hosted image is created, then save the step's image-id output as a repo variable named PIXTEX_IMAGE_ID — every run after that updates the same URL in place. Inputs, outputs and details in the Action docs.
The n8n community node
The Pixtex node puts all of this on your canvas. Render workflows to png / svg / pdf binary and pipe them into Slack, email or Drive nodes — or publish and update hosted images without ever touching a terminal. On self-hosted n8n, install it from Settings → Community Nodes; on n8n Cloud it is already there, verified.
No credential needed to render. Drag the node in, give it a workflow, get an image — the picture simply carries the same small watermark a free browser export does. A key raises the ceiling rather than opening the door: keyless renders share a daily allowance, a free key gets you 300 a month of your own, and Pro removes the watermark. Hosted images and account usage still need one, because those are owned by a key and have nothing to act on without it.
# n8n → Settings → Community Nodes → Install
n8n-nodes-pixtex

# then the self-updating diagram becomes a workflow:
#   Schedule Trigger → n8n (Get Workflow) → Pixtex (Hosted Image · Update)
# the imageUrl embedded in your README re-renders itself — no CI needed
The node's Workflow JSON field takes the n8n node's Get Workflow output as-is, so a workflow can document itself — even the one it runs in. Source on GitHub.
Endpoints
| method · path | what it does | cost |
|---|---|---|
| POST /v1/keys | Request an API key — emails a confirmation link | free |
| POST /v1/keys/claim | Confirm on the emailed link → the key is minted | free |
| GET /v1/keys/me | Key info, usage and limits | free |
| DELETE /v1/keys/me | Revoke the key + delete its hosted images | free |
| POST /v1/render | Render a workflow → image bytes | 1 render |
| POST /v1/images | Host a PNG at a permanent URL, with a permanent page | 1 render |
| PUT /v1/images/:id | Re-render a hosted image in place | 1 render |
| GET /v1/images | List your hosted images | free |
| DELETE /v1/images/:id | Delete a hosted image | free |
| GET /i/:id.png | The public image itself (embed this anywhere) | free |
| GET /images/:id | A hosted image’s public metadata — what its page at /w/:id reads | free |
Every /v1 call authenticates with Authorization: Bearer pxt_…, against https://api.pixtex.dev. Render responses include X-Renders-Remaining so your CI can budget.
Render options
The API takes the editor's full option set — same names, same values. Dial in the look in the editor, then send the same options from code. (format and scale apply to /v1/render only — hosted images are always PNG at 2×.)
| option | values | default |
|---|---|---|
| outputfile, size and frame | ||
| format | png · jpeg · webp · svg · pdf | png |
| scale | 1 · 2 · 3 · 4 | 2 |
| frame | auto · og · youtube · square · linkedin · x · portrait · story · custom | auto |
| customFrame | { w, h } in px, 320–4000 (with frame: custom) | — |
| padding | tight · normal · roomy (margin around the workflow) | normal |
| styletop-level | canvas · diagram (poster of labelled stages) | canvas |
| diagramtop-level | object — poster config and text edits, with style: diagram. See Diagram poster below. | — |
| surfacewhat the nodes sit on | ||
| background | dark · midnight · plum · gradient · white · paper · transparent · custom | dark |
| customBgColor | #rrggbb (with background: custom) | #101B2E |
| gridStyle | dots · lines · cross · none | dots |
| gridOpacity | 0.25 – 1 | 0.65 |
| nodesthe cards themselves | ||
| iconPack | custom · n8n (real n8n artwork) | custom |
| nodePalette | punch · candy · sunset · mono (custom pack) | punch |
| settingsStyle | stamp · pixel · zine · patch · pinned · rigged (custom pack marks) | stamp |
| cardGeometry | v2 (96px/20r) · v1 (100px/8r) — which n8n your canvas is | v2 |
| nodeDetail | minimal · standard · detailed | standard |
| iconShape | square · rounded · circle | rounded |
| outlineOpacity | 0.05 – 1 (n8n pack node borders) | 0.15 |
| nodeTint | stock · match (n8n pack, dark bgs) | stock |
| nodeGlow | 0 – 1 (with nodeTint: match) | 0 |
| layoutwhere the cards go | ||
| layout | original · auto · compact (auto + row wrap + packed sub-flows) | original |
| layoutDirection | LR · TB · auto | auto |
| spacing | compact · normal · spacious | normal |
| stickyMode | n8n · wrap (sticky notes on auto layout) | n8n |
| agentPortOrder | canonical (n8n order) · wired (as you connected them) | canonical |
| edgesthe wires between them | ||
| edgeStyle | curved · straight · step | curved |
| dimUnhighlighted | true · false (fade un-accented wires) | false |
| edgestop-level | object — per-wire label and accent. See Edge annotations below. | — |
| annotationswhat is drawn on top | ||
| showTitle | true · false — name, node count and date in the corner. Drawn only when the workflow has a name. | true |
| showLegend | true · false (colour key for node categories) | false |
| showGroupBorders | true · false (box each AI Agent with its sub-nodes) | false |
| showMarksKey | true · false (decoder for the settings marks) | true |
| showWatermark | true · false — forced on for hosted images on the free tier | true |
Edge annotations
To annotate the wires, add a top-level edges object — a map from connection id to per-wire edits. Each value takes a label (≤ 60 chars) and/or an accent (#rrggbb) to highlight it. Pair an accent with dimUnhighlighted: true for a focus-mode image. The easiest way to get the ids and values is to arrange it in the editor first.
{
  "edges": {
    "Webhook-main-0-Set-0": { "label": "only if paid", "accent": "#FF4500" }
  },
  "options": { "dimUnhighlighted": true }
}
Diagram poster
Send style: "diagram" and the workflow is condensed into a flowchart poster of labelled stages instead of a canvas. The optional diagram object beside it configures that poster and can overwrite any text on it — every field is optional, and the engine derives whatever you leave out.
| field | what it does |
|---|---|
| heading | string — the poster title, replacing the derived one |
| subheading | string — the line under it |
| summary | string — a paragraph above the first card |
| footer | string — the line along the bottom |
| detail | steps · stages · story — how hard the poster condenses |
| design | on · off — the designed page, or the plain one |
| theme | paper · ink · mono · blueprint · midnight · lane · frost · terminal |
| width | narrow · wide — column room, not page width |
| numbered | true · false — number the steps on the main path |
| showIcons | true · false — service icons on the cards |
| showTags | true · false — the service name under a title |
| labels | { "src→tgt": string } — rename one branch label |
| boxes | { [nodeId]: { title, description, tag } } — edit one card |
Limits
The 500-node ceiling is not a guess. The largest workflow in our census of 10,957 public n8n templates is 213 nodes and the median is 12, so every published template on n8n.io fits inside it with room to spare.
Beta defaults — they will grow, not shrink. Keys are free and self-serve; your workflow JSON never appears in a URL or a log, render requests are processed in memory, and hosted images store only the final PNG. Revoking a key immediately deletes its hosted images.
Questions
Is there an API to render an n8n workflow as an image?
Yes. POST your workflow JSON to https://api.pixtex.dev/v1/render with a Bearer key and the response is the finished image — png, jpeg, webp, svg or pdf. Keys are free and self-serve, and the endpoint takes the same option names the web editor uses.
How do I get a Pixtex API key?
Request one on this page or run npx pixtex signup you@example.com. You confirm by email and the key is minted immediately. Keys are stored as SHA-256 hashes only, so the key itself is shown once and never again.
What are the free limits?
300 renders per month per key, a burst limit of 20 renders per 10 minutes, 50 hosted images, and workflows up to 500 nodes or a 10 MB body. Free-tier hosted images carry a small Pixtex watermark.
Can I render an n8n workflow from Python?
Yes, and there is no SDK to install — it is one requests.post. Send {"workflow": …} to https://api.pixtex.dev/v1/render with an Authorization: Bearer header and write response.content straight to a .png file. Every snippet in these docs has a Python tab beside the shell one.
How do I embed an n8n workflow diagram in a GitHub README?
POST the workflow to https://api.pixtex.dev/v1/images. The response carries a permanent image URL, a permanent page URL and a ready-made markdown line — paste the markdown into the README, and send the page to anyone who should see the diagram without opening n8n. When the workflow changes, PUT the same id and every embed updates in place, so the picture in the README never drifts from the flow it documents.
What image formats can the Pixtex API return?
png, jpeg, webp, svg and pdf. Set format on /v1/render, and scale (1–4) for the pixel density. Hosted images served from /i/:id.png are always PNG at 2x, so an embed URL always resolves to a PNG no matter what the workflow contains.
Worked examples live in the guides: a self-updating diagram in a README, batch-rendering a template library, and the basics of exporting a workflow as an image.